


We all deserve a little pampering every now and then, don't we? With the right tools, you can take self-care to the next level. DIY lash extension kits are quickly becoming one of 2023's hottest trends in beauty and wellness! Whether you're looking for an easy way to glam up your look or just want to treat yourself to some relaxation, this guide has everything you need to know about unleashing the power of these amazing products.

The world of DIY lash extensions is filled with endless possibilities – from natural looks that enhance your existing lashes to dramatic styles that will turn heads. No matter what kind of statement you want to make, you'll find everything you need in our comprehensive guide. We'll discuss all types of kits available on the market, how they work and even provide step by step instructions for creating beautiful lashes at home. Plus, there are plenty of tips and tricks along the way so you can get salon-quality results without having to leave the house.
Ready to learn more? Let's explore the exciting world of DIY lash extensions together and discover why everyone is loving them so much!
Definition Of Lash Extension Kits
Lash extension kits are a great way to get the look of beautiful, full lashes without spending money at a salon. They're an affordable and convenient option for those who want to take their lash game up a notch. Lash extensions can be applied with ease in the comfort of your own home and they provide long-lasting results that leave you feeling confident and glamorous.
So, what exactly is included in these do-it-yourself lash extension kits? Most commonly, they come with everything needed to apply individual lashes or strip lashes; including adhesive glue, tweezers, micro brushes, and sometimes even mascara wands. Some sets may also include false eyelashes of varying lengths and thicknesses as well as step-by-step instructions on how to properly apply them.
The process itself isn't complicated but it does require patience and precision when applying individual lashes. It’s important to start by using clean tools: wash hands before applying any product near the eyes; use disposable applicators like q-tips if possible; and make sure all products used are approved for eye contact. Then select the desired length/thickness of lash from the kit - this will depend on personal preference – before carefully glueing each one onto its respective natural eyelash with tweezers. The final result should be fuller, more voluminous looking lashes that last for weeks!
With DIY lash extension kits now widely available online, beauty enthusiasts everywhere can easily achieve gorgeous celebrity looks without breaking the bank!
Benefits Of Diy Kits
Doing your own lash extensions can be beneficial for many reasons. Firstly, when you do it yourself, you don’t need to worry about the cost of going to a salon or spa. DIY kits are often much more affordable than having them done professionally and they usually come with everything that is needed to get started. Secondly, there is something very satisfying in taking matters into your own hands and creating an aesthetically pleasing look using only what's included in the kit. Thirdly, these kits allow you to customise your lashes according to your individual style and needs without any outside help. Finally, since most DIY kits come with instructions on how to apply the extensions properly, achieving beautiful results has never been easier. With all these benefits combined, DIY lash extension kits provide an easy way for anyone looking for longer and fuller lashes without breaking the bank.
Tools And Supplies Needed
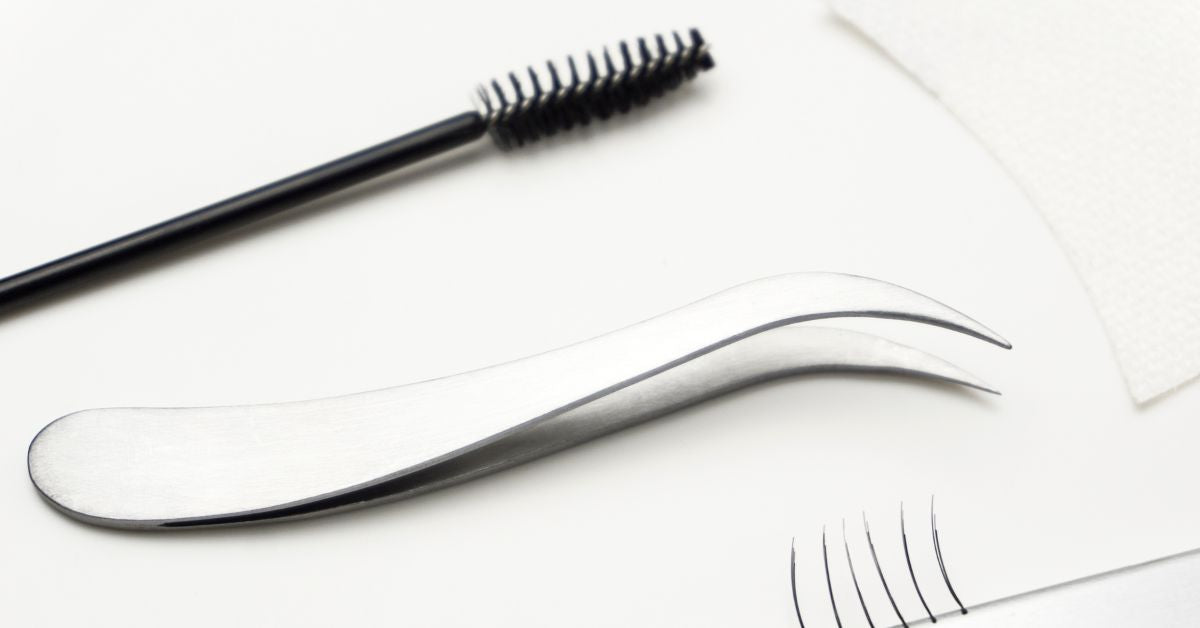
When it comes to DIY lash extension kits, the right tools and supplies are essential. To get started with your kit, you'll need a few basic items like tweezers, glue, adhesive remover, and lash extensions. You may also want some extras like scissors or micro brushes for precision application.
Tweezers come in various shapes and sizes, so choose ones that fit comfortably in your hand. Look for slanted tips and rubber-coated handles for better grip. Glue should be specifically designed for eyelash extensions; make sure it says “latex free” on the bottle. Adhesive remover is used to dissolve any excess glue if needed. Lastly, lash extensions come in different lengths and colours — pick out what works best for your eye shape!
In addition to these basics, having an illuminated magnifying mirror can make all the difference when applying lashes accurately. Also consider investing in a good pair of curved scissors to help trim down longer strands before attaching them. Micro brushes will help keep things neat during application as well as aid with cleaning up any leftover glue residue after each use.
With the right equipment in place, you'll be ready to start creating beautiful looks at home!
Safety Tips For Application
Now that you have all the necessary supplies, it's time to start learning about safety tips for application. First and foremost, always make sure your work space is clean and free of any debris or contaminants. This will help ensure a safe environment while applying the lashes. When removing the lash strips from their packaging, be gentle so as not to damage them in any way. Once removed from their packaging, use tweezers to separate each individual lash strip before attempting to apply them onto your eyelid.
Next, use an adhesive specifically made for eyelash extensions when affixing the strips. Make sure you don't get too close to the eye area with the glue; otherwise you may cause irritation or infection. Additionally, keep track of how long you wear each set of lashes as this can affect their longevity and overall health of your eyes. It's important to replace old sets every few weeks to prevent bacteria build-up on your natural lashes.
When it comes time to remove the extensions, avoid pulling directly at them since this could potentially damage your natural lashes or even pull out some of them altogether! Instead, lightly dampen a cotton pad with an oil-based remover and place over top of the extension until they are able to slide off easily with minimal tugging required. Never attempt to remove extensions without using a removal product – these products are specially formulated for safe and easy removal without damaging either natural or artificial lashes!
Finally, take good care of both your own and false eyelashes by regularly cleaning them with mild soap and water solution followed by patting dry with a clean cloth – this will help reduce inflammation caused by dirt buildup and promote healthy looking skin around the eyes! With proper knowledge and practice, DIY lash extension kits can provide beautiful results safely and effectively - no need for expensive salon visits anymore!
Choosing The Right Lash Length And Curl Type
When choosing the right lash length and curl type for you, it's important to have an understanding of your own eyelashes. It’s best to choose a lash that is similar in shape and size as your natural lashes. This will create a more seamless look when applying the extensions. When selecting the appropriate length, keep in mind that longer lashes will give you a more dramatic appearance while shorter ones will be less noticeable. As for curl types, there are several common styles such as J-curl or C-curl which should match up with the curvature of your existing lashes.
It’s also important to consider the adhesive used for attaching the extensions. Some adhesives contain chemicals that can irritate sensitive eyes so make sure you read all labels before making a purchase. Additionally, some glues require special ventilation systems during use and must only be applied by certified professionals. If you plan on taking care of them yourself, opt for an adhesive that is easy to work with and won't cause any discomfort or irritation.
Finally, double check that everything fits correctly before beginning application. Measure each extension against your natural lash line and adjust accordingly if needed – too long or too short could throw off the entire look! Taking these steps ahead of time can help ensure successful application of your DIY Lash Extension Kit!
Adhesive Selection
Now that you've chosen the right lash length and curl type, it's time to make sure you have the proper adhesive for your DIY lash extension kit. Adhesives are a crucial element in achieving beautiful lashes without having them fall off shortly after application. Knowing what kind of adhesive will best suit your needs is essential in ensuring long-lasting results.
The most commonly used adhesives for eyelash extensions are medical grade cyanoacrylate glues. These types of glue set quickly and can last up to six weeks with proper maintenance. They come in different varieties depending on their viscosity level or thickness. The higher the viscosity, the longer it takes for the glue to dry, which makes it ideal for beginners as they won’t need to work as fast when applying individual lashes. Low viscosity glues, however, tend to be more difficult to use due to their quick drying properties – so only experienced professionals should consider using this kind of adhesive.
When selecting an adhesive, also take into consideration its compatibility with your natural lashes and skin type. If you have sensitive eyes or skin allergies, opt for hypoallergenic formulas instead of traditional ones. It's important to note that some brands offer adhesives specifically designed for synthetic mink and silk fibres; these provide a secure bond but may cause irritation if not compatible with certain eye shapes or sensitivities.
To ensure optimum performance from your adhesive, always apply it at room temperature and keep it stored away from heat sources such as direct sunlight or heating vents. Regularly check its expiration date too – expired products can lead to poor attachment and premature shedding of your extensions! With a bit of research and experimentation with quality products, you'll soon find the perfect formula suitable for all your lashing needs.
Step-By-Step Guide To Application
Applying DIY lash extensions can be intimidating, but it doesn't have to be. With the right tools and a bit of practice, anyone can master the art of self-care with ease. Here's a step-by-step guide on how to apply your kit safely and effectively:
First, you'll need to prep your lashes for application. Make sure that they are clean and free from any oils or debris. Gently brush through them using a spoolie wand or mascara wand before you begin. Next, select the appropriate size extensions for your eye shape and natural lash length. Place each one carefully onto the root of each individual lash, making sure not to over apply in any area. If needed, use tweezers to help secure them into place.
Once all of your extensions are applied, it’s time to seal the deal! Use an adhesive specifically designed for lash extensions; this will ensure optimum wearability and longevity of your look. Start by applying a thin line along the base of each extension then wait about 30 seconds until the adhesive turns clear before pressing gently together with your finger tips. Finally, set everything with a light misting of setting spray and voila – you're ready to go!
No matter what type of look you’re going for, these simple steps should help get you there quickly and easily. From prepping your existing lashes to getting those newly acquired ones secured properly, following these instructions will make it easier than ever before to start enjoying beautiful results every single day!
Caring For Your Extensions
Now that you know how to apply your DIY lash extensions, it's time to learn about the proper care and maintenance. Properly caring for your lashes is key in ensuring they look their best every day. Here are some tips on how to keep them looking great:
First of all, you should be brushing through your extensions regularly with a clean spoolie brush – this will help spread out any clumps or tangles and make sure each extension lies flat against your natural eyelashes. You'll also want to avoid using heavy mascaras as these can weigh down the individual fibers making them droop faster than usual.
Secondly, when showering or washing your face, always use lukewarm water rather than hot water so as not to damage the adhesive bond between the fibers and your own natural lashes. Also avoid getting the extensions wet especially within the first 24-48 hours after application. Doing so may weaken the adhesion causing premature loss of strands.
Thirdly, if possible try sleeping on your back instead of on one side - this helps prevent breakages and makes sure none of the extensions get squished up against sheets or pillows which could cause them to fall out prematurely. If you must sleep on one side then consider using an eye mask over both eyes before bedtime.
Finally, regular touch-ups are recommended every 4 weeks or so depending on how quickly you lose lashes naturally; this will ensure you maintain fullness throughout the entire duration of wear without having too many gaps between strands. With proper care and attention, you can expect beautiful results from your DIY lash kit!
Removal Techniques
Removing your lash extensions is an important part of the process. It's essential to properly remove them in order to maintain healthy lashes and keep them looking their best. To begin, you'll want to purchase a removal kit that contains all the necessary materials for safe and effective removal. This should include tweezers, a special remover solution, and cotton swabs.
The next step is to use the tweezers to carefully pull out each individual extension from its base at the eyelid line. Be sure not to tug too hard as this can cause breakage or damage to your natural lashes. Once removed, dip the cotton swab into the remover solution and gently wipe away any remaining adhesive residue around the eye area. Make sure not to get any of the remover solutions directly on your eyes or skin!
It's also important to cleanse your face after removing your extensions with a gentle cleanser or micellar water. This will help protect against bacteria buildup and leave your skin feeling refreshed. Finally, make sure you store your unused lash supplies in a cool dry place such as inside a plastic container so they last longer and stay sterile for future use.
Troubleshooting Common Issues
Now that you've learned the basics of removal techniques, it's time to dig in and learn how to troubleshoot any issues with your DIY lash extension kit. While self-care is all about taking control of your own beauty routine, there are bound to be some common hiccups along the way. Here are a few tips for tackling those problems head on.
First, if you see that one or more lashes have started coming loose from their adhesive bond prematurely, try using tweezers to gently adjust the angle at which they lay against your skin. This can help them lock into place better and last longer until your next touchup session.
Another issue you may run into is having an uneven amount of lash extensions applied to each eye - this can be caused by an excess of glue being used when applying them or simply due to inexperience with handling false eyelashes. To remedy this situation, start by removing any excess glue from both eyes then use tweezers to carefully reshape any clumps of lashes so they lie flat against your lids. Once everything looks even and symmetrical again, apply fresh adhesive as needed and let dry before wearing again.
Finally, don't forget that proper aftercare is essential when it comes to getting the most out of your DIY lash extensions! Gently brush through them each morning with a clean mascara wand, avoiding tugging too hard around the roots; remove all traces of makeup before bedtime; and avoid submerging them in water during showering or swimming activities as this will weaken their adherence over time. With these simple steps taken care of, you'll find yourself able enjoy long-lasting beautiful lashes for months on end!
Frequently Asked Questions
What Is The Average Cost Of A Diy Lash Extension Kit?
When it comes to DIY lash extension kits, one of the biggest questions is what the average cost might be. When considering purchasing a kit for self-care purposes, it's important to familiarise yourself with the prices and determine if this type of product fits into your budget.
The cost of a DIY lash extension kit can vary depending on several factors such as brand, quality, and type of lashes included in the kit. Generally speaking, you can expect to spend anywhere from R900-R3500 on a starter or basic lash extension kit. Mid-range kits are typically around R2000-R4000, while higher end professional grade kits may go up to R6000+.
In addition to the initial cost of the kit itself, there are additional supplies that will need to be purchased separately such as adhesive glue and other tools like tweezers and scissors. These items usually range between R170-R360 each which should also be taken into consideration when budgeting for a DIY lash extension kit purchase.
It is possible to find cheaper options online but they often lack necessary components needed for successful application so it’s best to stick with more reputable brands who have been tested by professionals and certified safe. Ultimately, whether you decide to invest in an expensive top-of-the line lash extension kit or opt for something more economical depends entirely upon your personal preferences and financial situation.
Are Lash Extension Kits Suitable For Use On Sensitive Eyes?
Are lash extension kits suitable for use on sensitive eyes? This is an important question to consider when deciding if DIY lash extensions are the right choice. While most eyelash extensions can be safely used, there are certain factors that need to be taken into account before making a purchase.
For starters, those with very sensitive eyes should look for products that specifically state they are designed for this purpose. Additionally, it’s important to check the ingredients list of any product being considered as some may contain compounds which could cause irritation or allergic reactions in people with sensitivities.
In addition to looking at the ingredients list and reading reviews from other users who have purchased the product, it's also important to consider how easy the application process will be when using a DIY kit. If you're not experienced with applying lashes yourself then opting for one-time use products like magnetic lashes is probably best since these require no glue or tools and can be easily removed after wear.
When selecting your kit, research each brand thoroughly and make sure that all safety precautions listed by manufacturers are followed closely during application - taking extra care around sensitive areas such as near the eye socket or inner corner of the eye itself. With proper preparation and careful application, anyone can enjoy beautiful lash extensions regardless of their sensitivity level.
Are There Any Particular Eye Shapes That Are Better Suited For Lash Extensions?
Lash extensions have become a popular beauty trend, allowing people to achieve longer and thicker lashes with minimal effort. But are there any particular eye shapes that are better suited for lash extensions? The answer is yes! Different eye shapes can affect the overall look of the lash extensions, so it’s important to consider this before getting your own.
Those with round eyes tend to be well-suited for lash extensions since they provide an ideal canvas from which to work. Lash extensions on round eyes will help create the appearance of length, as opposed to simply filling in gaps or creating volume. For those who have hooded eyes, however, it may not be possible to apply lash extensions at all due to their unique shape.
In contrast, almond-shaped eyes are often the most versatile when it comes to lash extension application. With these types of eyes, you can choose between either lengthening or volumizing effects depending on what type of look you want. Additionally, winged liner looks great with almond-shaped eyes because you don’t need too much product in order to get the desired effect.
It's also important to remember that even if your eye shape seems conducive for applying lash extensions, always consult a professional first before attempting DIY kits. This way, you can make sure that everything is done properly and safely without risking damage to your natural lashes or causing discomfort around your delicate eye area. Professional technicians understand how different eye shapes should be approached and know exactly what techniques should be used in order to ensure a successful result.
How Often Should I Apply Lash Extensions?
When it comes to applying lash extensions, there is no one-size-fits-all approach. Different eye shapes and sizes require different amounts of upkeep when it comes to maintaining the look of lash extensions. One important factor in this equation is how often you should apply lash extensions.
Applying lash extensions too frequently can lead to thinning or breakage of natural lashes, while infrequent application may cause your desired look to be lost. In order to find a balance between these two extremes, it's important to understand what frequency works best for your individual needs.
For those with sparse lashes that are prone to breakage, applying them every four weeks will give ample time for the lashes to grow back stronger and fuller before they need replacing again. If you have naturally full eyelashes but still want dramatic length and volume, then you can opt for longer periods between applications – up to eight weeks if necessary. This ensures that your own lashes remain strong enough without compromising on the glamourous effect created by the false ones.
Overall, experimentation is key when determining your optimal application schedule as everyone's needs differ depending on their unique situation. When done correctly, lash extension maintenance can ensure beautiful results lasting for months at a time!
How Quickly Can I Expect To See Results From Using A Diy Lash Extension Kit?
When it comes to DIY lash extension kits, many people want to know: how quickly can they expect results? With the right tools and technique, you could begin to see improvements in your lashes within a matter of days. However, for longer-lasting effects, consistency is key.
To get the most out of using a DIY lash extension kit, it’s important to be consistent in applying the extensions. This means that you should aim to apply them every two weeks or so. If this isn't possible due to time constraints or other commitments, then you may need to look at alternative solutions such as semi-permanent eyelash extensions applied by an experienced professional instead.
It’s also important to ensure that you are following all instructions provided with the kit carefully. Different kits may contain different products and require different methods of application - so make sure you read through any instructions carefully before beginning! Additionally, it's best practice not to overwork your own natural lashes - keep applications light and gentle. It’s also worth investing in quality supplies from reputable brands; cheap materials might save money in the short term but won't last as long or provide as good results overall.
Overall, when used correctly and consistently, DIY lash extension kits can offer fantastic results - allowing users more control over their beauty routine while saving both time and money compared with visiting salons regularly for regular maintenance sessions. With patience and care, anyone can achieve beautiful looking eyelashes without having to leave home!
Conclusion
In conclusion, DIY lash extension kits are an affordable and convenient way to achieve beautiful lashes. With a little patience and practice, anyone can master the art of applying their own extensions. The cost is minimal compared to professional services, making this a great option for those on a budget.
When it comes to sensitive eyes or particular eye shapes, the best course of action is always consulting with your doctor first before attempting any kind of beauty service at home. As far as frequency goes, it's usually recommended that you apply new lashes every two weeks or less depending on your desired look. Results from using these kits will vary but they should become visible within three weeks when done correctly.
Overall, unlocking the power of self-care through DIY lash extension kits can be incredibly rewarding - not only aesthetically speaking but also financially! If you're looking for an alternative way to enhance your natural beauty without breaking the bank, then this could be just what you need!


Share:
Maintenance of Lash Extensions
How To Safely Apply And Remove Diy Lash Extensions At Home