


Are you tired of having to go to a salon every month for your eyelash extensions? Have you ever wanted to learn how to apply and remove DIY lash extensions at home safely? If so, then this article is just what you need!

Do-it-yourself (DIY) lash extensions are becoming increasingly popular. Not only do they save time and money, but they also allow us to customise our own look. With the right tools and techniques, anyone can become an expert in applying their own lashes from the comfort of their own home.
In this article, we will discuss exactly how to safely apply and remove DIY lash extensions with ease. We'll provide step-by-step instructions, as well as helpful tips on how to get the most out of your experience. So keep reading if you want to learn more about transforming yourself into a professional makeup artist!
Overview Of Diy Lash Extensions
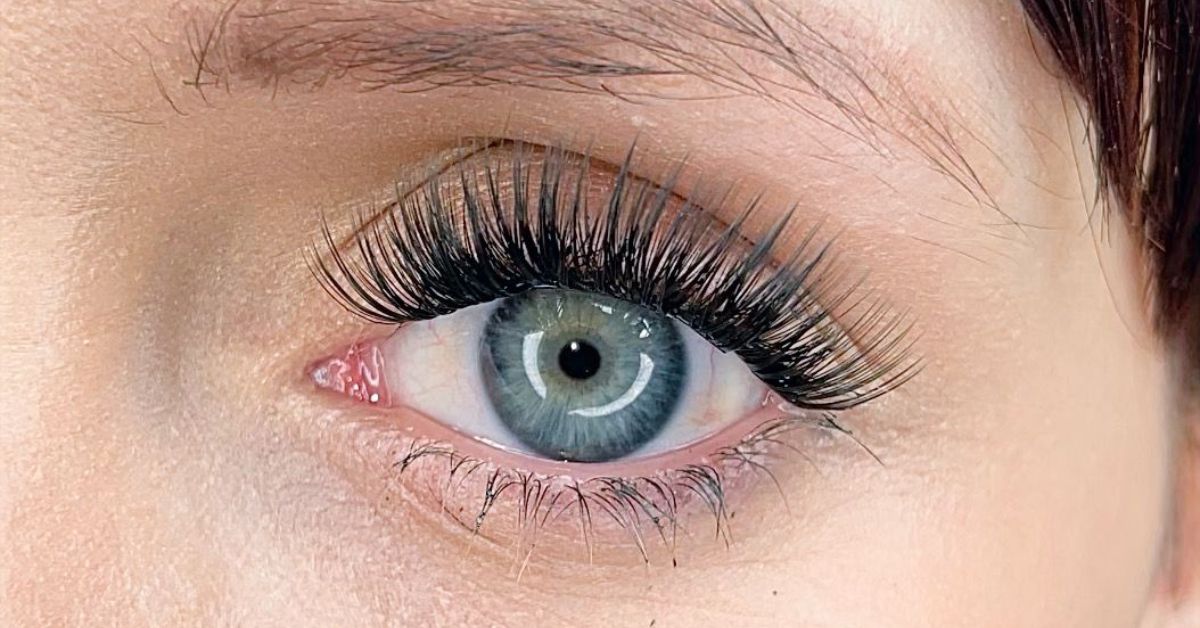
DIY lash extensions offer an affordable and convenient way to achieve beautiful, natural-looking lashes without the need for professional services. They’re easy to apply and remove at home with minimal effort, making them ideal for those who want to save time on their beauty routine. However, it is important to understand how to safely apply and remove lash extensions in order to avoid damaging your eyes or skin.
When shopping for DIY lash extensions, look for products made from high quality materials that are gentle on the skin. Synthetic mink or silk fibres are best as they provide a more natural appearance than cheaper synthetic fibres. It's also important to select the right length and thickness of extension for your eye shape - too long or thick can be uncomfortable and difficult to work with.
Before applying any type of eyelash extensions, make sure you have all the necessary tools including tweezers, adhesive glue, remover pads, mascara wands, etc., so you don't get stuck halfway through the process. Additionally, read up on proper application techniques beforehand - this will help prevent mistakes which could damage your eyes or cause irritation. Finally, take extra care when handling the eyelash extensions around sensitive areas like near your tear ducts.
Applying DIY lash extensions requires patience and steady hands; however following these simple tips will ensure you get beautiful results quickly and easily!
Necessary Supplies And Tools
When it comes to applying and removing DIY lash extensions, there are certain supplies and tools you must have. Firstly, you need a pair of tweezers that are specifically designed for lash application and removal. Secondly, a good quality adhesive is essential; make sure the one you choose is formaldehyde-free. Thirdly, an eyelash brush and/or comb should be used to separate lashes before and after glueing them together. Finally, oil-based makeup remover or cleanser can help with both prepping your natural lashes as well as getting rid of excess glue from the extensions once they've been removed. All these items will ensure safe and successful results when doing lash extensions at home.
Preparing The Lashes
Now that you've gathered all the necessary supplies and tools for applying DIY lash extensions, it's time to prepare your lashes. First, make sure you have clean hands and a clean surface before beginning. Then, use tweezers to gently remove any excess makeup or dirt from around your eyes. To ensure the most secure hold of the extensions, curl your natural lashes using an eyelash curler prior to application. This will also help keep them in place once they are in place.
Next, take one of the extension strips and carefully peel off the adhesive backing with tweezers. Once the strip has been removed, lay it flat on a paper towel so that you can easily pick up each individual lash from it without damaging them in any way. Make sure to work quickly as this type of glue dries fast!
When picking out which lashes you want to apply first, opt for longer ones for maximum impact. Place these near the outer corner of each eye and gradually move inward until every single lash is applied perfectly even on both sides. If needed, adjust their position with tweezers after glueing them down - just remember not to touch them too much or pull at them directly as this can cause damage over time!
Finally, allow the glue to dry completely before blinking (which could be anywhere between 10-30 seconds) then admire your beautiful new look!
Applying The Extensions
Applying DIY lash extensions at home can be a tricky task, but with the right materials and some patience, you'll have beautiful lashes in no time! First, start by selecting your desired length of extension. Then, use an eyelash glue to attach the new lash onto your existing one. Make sure to apply just enough adhesive so that it's secure - too much will make them look clumpy. If needed, cut off any excess length from the individual falsies before applying. Next, take a small tweezer or curved tip applicator tool and pick up an extension for each eyelid. Gently place it on top of your natural lash line as close as possible without touching the skin below. Continue until all extensions are applied and let dry for about 10 minutes. Finally, brush through all your lashes gently using a clean mascara wand – this will help blend them together into a beautiful full set of lashes.
Curing The Extensions
Once the DIY lash extensions have been applied, it's important to cure them. To do this, use a clean mascara wand or spoolie brush and gently comb through the lashes from root to tip in a single direction. Doing this helps to separate any clumps of glue that may have formed between the natural lashes and extensions. It also ensures that the extension fibres are evenly distributed across your lash line.
When brushing is complete, apply a light coat of oil-free mascara on top of the DIY eyelash extensions. This will help secure them in place and make them look fuller and thicker. Let the mascara dry completely before applying any other makeup products around your eyes.
It’s important to remember not to rub or tug at your lashes when removing eye makeup as this can cause damage to both your natural lashes and lash extensions. Instead, use an oil-based remover with a cotton swab along with gentle movements in order to loosen up stubborn mascaras or waterproof liners without damaging your extensions or pulling out hairs from their roots.
Finally, finish by washing off all traces of makeup with lukewarm water and patting dry with a soft towel for optimal results. Regularly cleaning and caring for your DIY eyelash extensions will ensure they last longer and keep looking beautiful!
Trimming And Styling The Lashes
Once the extensions have been securely attached to your natural lashes, it’s time to shape them. The best way to do this is to use tweezers and trim any long extensions that don’t blend with the rest of your lash line. You should also be sure to leave a small amount of space between each extension so as not to overcrowd them. This will help create a more natural-looking lash line. When you're done trimming, take some mascara and lightly brush through the extensions for an even more voluminous look. Be careful not to overdo it, though – too much product can weigh down the lashes and cause the adhesive to come undone.
To finish up styling, you may want to curl your now full set of lashes with a heated eyelash curler or just let them flutter naturally in their own beautiful shape! Whichever option works better for you, make sure they still remain separate from one another by combing through with a clean spoolie every morning before applying makeup. And voila - you've got yourself gorgeous looking DIY lashes that are ready for whatever lies ahead!
Cleaning And Maintaining The Lashes
It's important to keep your lash extensions clean and in good condition. Cleaning them will help prevent irritation, infection, or damage to the natural lashes. There are several steps you can take for proper cleaning and maintenance of your DIY lash extensions:
First, gently brush through the lashes with a spoolie every day. This will help keep them tangle-free and looking their best. It’s also a good idea to spray a gentle makeup setting spray on the lashes to hold them in place and protect them from dirt and debris.
Second, use an oil-free cleanser specifically designed for eyelash extensions once or twice per week. Be sure to avoid any products that contain alcohol, as this could dry out the adhesive and cause premature loosening of the extension bond. Make sure all residue is rinsed away before applying mascara or other cosmetics.
Third, remove eye makeup thoroughly at night using an oil-based remover that won't dissolve the glue used for the extensions. After removing your makeup, it’s best to lightly wipe over the top of each lash with a damp cloth or cotton pad soaked in warm water mixed with oil-free cleanser – this will help break down any remaining traces of makeup or oils which may have built up during the day.
Finally, remember not to rub or pull on your lashes when washing them—this can weaken the glue bonds and increase shedding over time. Instead, pat around your eyes very gently after cleansing until completely dry before reapplying mascara if desired. Taking care of your DIY lash extensions is key!
Removal Process
Once you've finished the cleaning and maintenance process of your DIY lash extensions, it's time to begin the removal process. This can be a delicate procedure that requires some patience, so make sure to take extra precautions when removing them.
The first step is to soak a cotton pad with an oil-based makeup remover or coconut oil and press it against each individual extension for at least 15 seconds. This will help loosen up the adhesive and make it easier to remove. Next, use tweezers to gently pull away any remaining glue from the base of the lashes. Be careful not to tug too hard as this could cause damage to your natural lashes.
When all of the extensions have been removed, cleanse your eyes with a gentle cleanser such as micellar water or baby shampoo. You may also want to apply a nourishing eye cream or serum afterwards in order to keep your skin hydrated and healthy looking. Finally, store your lash extensions back into their original packaging until you're ready to apply them again.
Disinfecting And Storing Supplies
It is important to disinfect and store supplies properly in order to ensure the safety of any DIY lash extension application. First, all materials should be wiped down with an alcohol wipe before each use. This will help reduce bacteria buildup on the tools. Second, storage containers should be lined with a clean paper towel or cloth that can then be discarded after every use. Third, tweezers used for applying lashes should be sanitised between uses by soaking them in rubbing alcohol or another cleaning solution recommended by the manufacturer. Finally, all unused false eyelashes should be stored away from direct sunlight and kept dry at room temperature so they do not become brittle or damaged over time. Taking these precautions will help keep your DIY lash extensions safe and long-lasting.
Post-Care Tips
Now that you’ve safely applied and removed your DIY lash extensions, it's time to focus on post-care tips. These will help keep your lashes looking full and healthy for longer. The first tip is to never sleep with wet extensions. Make sure they are completely dry before going to bed or napping. It's also important to avoid excessive eye makeup such as mascara or eyeliner while wearing the extensions, which can cause damage or weaken the bond of the adhesive.
Another way to ensure long lasting, beautiful lashes is to clean them daily with a mild cleanser, like baby shampoo diluted in warm water. This helps remove any dirt and bacteria from your lashes so they stay fresh and strong. Additionally, make sure not to tug at your lashes when cleaning, brushing, or combing them; this could lead to breakage or irritation. Lastly, try using a nourishing oil once per week after cleansing to condition your natural lashes and protect them from drying out due to the extension glue residue left over from application. Taking these steps should leave you with lush lashes for weeks!
Frequently Asked Questions
What Is The Best Type Of Glue To Use For Diy Lash Extensions?
When it comes to applying false lashes, the type of glue you use can be just as important as the quality of the lashes themselves. Not all glues are created equal and some may cause irritation or even damage to your natural lashes if used incorrectly. So what is the best type of glue for DIY lash extensions?
The best glue for DIY lash extensions is a latex-free adhesive specifically designed for eyelash applications. This type of glue won't irritate your skin or eyes and will hold securely without damaging your own lashes in the process. It's also important to choose an adhesive that dries quickly so that it doesn't smudge around your eyes, giving you a more professional look when finished.
It's always best to start with high-quality materials when doing any kind of at home beauty project. Investing in good quality glue helps ensure long lasting results while still being gentle on sensitive areas like your eyelids and under eye area. Additionally, since this type of glue isn’t intended to come into contact with other parts of your face, you don’t need to worry about potential reactions or irritation from using inferior products either.
In addition to choosing a safe product, following proper application instructions is essential for achieving beautiful and comfortable results with DIY lash extensions. Applying too much pressure when attaching falsies can pull out existing hairs and cause discomfort. Also make sure not to leave them on overnight! Removing lash extensions correctly before bedtime prevents bacteria build up which can lead to infections near the eye area. With these tips in mind, you should have no problem finding success with your next do-it-yourself lash extension project!
How Long Do Lash Extensions Last?
When it comes to lash extensions, one of the most commonly asked questions is: How long do they last? Generally speaking, you can expect your eyelash extensions to stay in place for around four weeks with proper care. However, this may vary depending on a number of factors such as the type of glue used and how often they are worn.
The lifespan of an extension also depends on its quality. For example, high-quality synthetic eyelashes will typically last longer than mink or silk ones due to their ability to withstand more wear and tear. Additionally, some brands have products specifically designed for extended wear which could make them last even longer than usual.
Another factor that affects the longevity of DIY lash extensions is how well you take care of them. It’s important to use proper cleaning techniques when removing makeup from your lashes each day so that dirt and debris don't accumulate over time and cause premature shedding. You should also avoid rubbing or tugging at your lashes too much as this can weaken the bond between the natural hair and the extension glue. Finally, avoiding contact with water during showers or swimming pools can help keep your lashes intact for a few extra days or weeks.
No matter what kind of adhesive you choose or how carefully you maintain them, all lash extensions will eventually need replacing - but with good upkeep, you can extend their life significantly!
Are Lash Extensions Difficult To Remove?
Removing lash extensions can be a tricky task. It’s important to have the right tools and know-how in order to remove them without damaging your natural lashes or irritating your eyes. There are several methods for removing lash extensions, each with its own pros and cons.
One popular way of removing lash extensions is using an oil-based product such as olive, coconut or baby oil. Oils will break down the bonding agents used to adhere the extension to your natural lashes, making it easier to slide off. However, this method requires more scrubbing than other techniques which could potentially cause damage to your lashes if done incorrectly.
Another option is an adhesive remover specifically designed for eyelash extensions. This solution dissolves the bonding agent quickly and thoroughly while being gentle on the skin around the eye area. The downside of this approach is that it may leave some residue behind so you'll need to wash away any remaining product after removal.
Finally, tweezing - although not recommended by professionals due to potential injury risk from incorrect technique use - involves carefully pulling out individual lashes one at a time with small tweezers. While this takes longer than other methods, it allows you to target specific areas where there may be stubborn glue still attached and ensure all residual product has been removed before applying new extensions.
It's clear that when it comes to safely removing lash extensions, there are multiple options available depending on preference and skill level. No matter what method you choose though, always take extra care when dealing with delicate eye area tissues!
How Often Should I Clean My Lashes?
Knowing how often to clean your lashes is an important part of proper lash extension care. Cleaning regularly will help keep the extensions looking their best and prevent bacteria from building up on them. However, over-cleaning can lead to dryness and damage so it's important to find a balance that works for you.
It's recommended that you clean your lash extensions every two weeks or so, but if you find yourself getting oily or have a lot of product build-up then more frequent cleansing may be necessary. You should also thoroughly wash your lashes after wearing makeup all day or any time they get exposed to water.
The type of cleanser you use is just as important as how often you cleanse. It's best to use one specifically designed for eyelash extensions since these are formulated not to strip away natural oils from the skin and lashes like harsher products might. Most come in foam form, which makes them easier to apply without irritating the eyes.
When cleaning your lashes, gently massage the cleanser onto each eye using circular motions with a cotton swab or pad and rinse off with lukewarm water when done. Afterward, pat with a soft towel and let air-dry before applying anything else such as mascara and/or primer. Taking these steps will ensure that your lash extensions remain healthy and look their best!
Can I Use Diy Lash Extensions If I Wear Glasses?
Wearing glasses can be a challenge when applying DIY lash extensions, but it's not impossible. If you wear glasses and want to try out the look of lash extensions for yourself at home, there are some steps that you need to take in order to do so safely.
Firstly, make sure your glasses fit snugly against your face. Any gaps between the frames and your skin may cause the lashes to get stuck in them and pull on your natural lashes. Also, ensure that any adhesive used is applied away from where your glasses will sit on your face. This way, if they slip while wearing them, no glue or other chemicals will come into contact with your eyes.
Another thing to consider is how often you plan on taking off and putting back on your glasses throughout the day. Since DIY lash extensions last up to six weeks before needing a fill-in or removal session, having to frequently remove and put back on your eyewear could cause extra strain on both the extensions and your own natural lashes over time. For this reason, many people opt for wearing contacts when doing their own DIY applications.
The key takeaway here is that with careful consideration and planning ahead, it’s possible to apply DIY lash extensions even if you wear glasses - just practise good hygiene habits as usual for best results! Taking preventive measures such as making sure the adhesive doesn't come into contact with the lenses of your eyewear will help you achieve stunning lashes without any complications down the road.
Conclusion
In conclusion, applying and removing DIY lash extensions at home can be achieved safely with the right tools. Using a good quality glue specifically designed for lash extensions will help ensure that your lashes last longer and look better. It's important to remember that lash extensions don't last forever, so you'll need to replace them every few weeks or months depending on how quickly your natural eyelashes grow. However, removing them is not difficult as long as you use an oil-based remover. Cleaning your lashes routinely helps keep them healthy and reduces the risk of infection from bacteria build up. Finally, if you wear glasses it is still possible to wear DIY lash extensions – just make sure there is plenty of space between your lenses and your lashes for comfort. With proper care and preparation, DIY lash extensions can be a great way to enhance your eyes without having to visit a salon!


Share:
Unleashing The Power Of Self-Care: 2023's Ultimate Guide To Diy Lash Extension Kits
Online Resources And Tutorials For Mastering Diy Lash Extensions In 2023