


Introduction
Lashes hold a paramount place in the realm of eye makeup, serving not just as a beauty enhancer but as a means to express one's style and personality. The allure of well-defined lashes can transform the look of the eyes, making them appear more open, lifted, and vibrant. In the pursuit of achieving the perfect lash look, DIY cluster lash trays have emerged as a game-changer. These trays offer a versatile and cost-effective solution for beauty enthusiasts who wish to customise their lash styles without the commitment or expense of professional lash extensions.
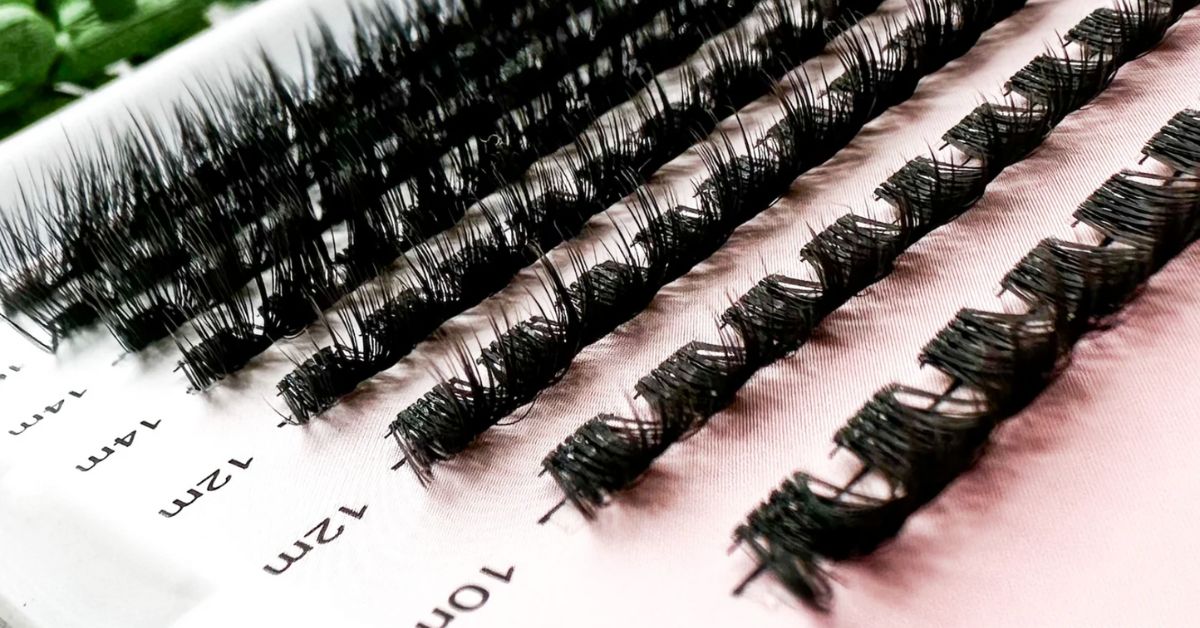
What You Need
Before diving into the art of lash application, it's essential to gather the right tools. A basic kit should include:
- DIY Cluster Lash Tray: A selection of individual lash clusters in various lengths and thicknesses, allowing for a customisable look.
- Lash Glue: A high-quality adhesive that ensures your lashes stay in place all day, yet is gentle enough to not harm your natural lashes.
- Lash Applicator: A tool specifically designed for eyelash application that offers better control and positioning than traditional tweezers.
- Mirror: A good, well-lit mirror is essential, preferably one that allows you to see your eyes from various angles.
Each of these items plays a vital role in the lash application process. The DIY lash tray offers variety, the glue provides durability, tweezers and the applicator offer precision, and the mirror ensures proper placement and symmetry.

Understanding Lash Styles
Choosing the right lash style is crucial in achieving your desired look. Here's a breakdown of popular styles:
- Natural Look: Ideal for everyday wear, this style enhances your lashes subtly, adding length and slight volume without appearing too dramatic.
- Cat-Eye: By placing longer lashes towards the outer corners of the eyes, the cat-eye style creates a sultry, winged look, elongating the eye shape.
- Doll-Eye: This style uses longer lashes in the centre of the eye to create a wide-eyed, youthful appearance, perfect for round and smaller eye shapes.
Each lash style has a unique effect on the eye shape and overall appearance. For instance, almond-shaped eyes can carry off most styles, while round eyes benefit from the cat-eye style for an elongated look. Monolid eyes can achieve depth with the doll-eye style, and hooded eyes may prefer a natural look to avoid overpowering the eyelid space.
Tips on Choosing the Right Style
Selecting the right lash style involves considering your eye shape, the occasion, and your personal preference. Here are some tips:
- Assess Your Eye Shape: Understand your eye shape—be it almond, round, hooded, or monolid—and choose a style that complements it.
- Consider the Occasion: Opt for a natural look for daytime or professional settings, and reserve more dramatic styles like cat-eye or doll-eye for evenings or special occasions.
- Personal Preference: Ultimately, the style you choose should make you feel confident and comfortable. Don't be afraid to experiment with different styles to find what works best for you.
By understanding these lash styles and considering your unique features and needs, you can master the art of DIY lash application, achieving professional-looking results from the comfort of your home.
Preparing Your Lashes
The key to flawless lash application begins with proper preparation of your natural lashes. This ensures not only the longevity of your lash clusters but also maximises comfort throughout wear. Follow these steps to prepare your lashes:
- Cleaning: Start with a clean base by gently removing any makeup, oils, or residue from your eyelids and natural lashes using a mild, oil-free cleanser. This prevents any interference with the adhesive's bonding ability.
- Drying: Pat your eyelids and lashes dry with a soft, lint-free towel. Ensure there's no moisture on your lashes, as this can dilute the lash glue and weaken its hold.
- Priming: Apply a small amount of lash primer (if available) to your natural lashes. This step is optional but can enhance the glue's grip and increase the wear time of your lash clusters.
The importance of a clean base cannot be overstated. It not only promotes better adhesion but also reduces the risk of infections and irritations, providing a comfortable wearing experience.
Customising Your Cluster Lashes
Customising your cluster lashes allows for a personalised look that complements your eye shape and desired style. Here's how to select and customise clusters:
- Selecting Clusters: Examine the tray and note the variety of lengths and thicknesses available. Choose shorter clusters for the inner corners of your eyes and longer ones for the outer corners or the middle, depending on the desired style.
- Mixing Lengths and Curvatures: Don't hesitate to mix different lengths and curvatures to create a multidimensional look. For instance, mixing lengths can add depth to a natural look, while consistent longer lengths towards the outer corners achieve the cat-eye effect.
Application Techniques
Applying cluster lashes with precision can transform your eye makeup. Here's a detailed guide for each style:
- Natural Look: Start applying the shortest clusters at the inner corner, gradually increasing the length as you move towards the outer corner. The key is subtlety and enhancing your natural lash line without overpowering it.
- Cat-Eye: Focus on elongating the eye shape by placing longer clusters towards the outer corners of your eyes, tapering off to shorter clusters as you move inwards. This creates the iconic winged-out effect.
- Doll-Eye: Place longer clusters in the centre of your lash line and shorter ones towards both the inner and outer corners. This rounded placement opens up the eye for a youthful, wide-eyed appearance.
Always aim for symmetry and blend the clusters with your natural lashes using a clean mascara wand. This integration ensures a seamless, natural-looking finish.
Aftercare and Maintenance
Proper aftercare is essential for maintaining the longevity and appearance of your lash clusters. Here are some tips:
- Cleaning: Gently clean around the lashes with an oil-free makeup remover. Avoid rubbing the lashes directly.
- Sleeping Positions: Try to sleep on your back to avoid crushing the lashes, which can lead to premature shedding or misshaping.
- Removal and Cleaning: When it's time to remove the clusters, use a dedicated lash glue remover to gently dissolve the adhesive. Clean the clusters carefully and store them for future use.
Troubleshooting Common Issues
Encountering issues is common, but most can be easily fixed:
- Misalignment: If a cluster is not aligned with your natural lash line, gently remove it, clean off the adhesive, and reapply.
- Discomfort: Any discomfort usually means the cluster is too close to the eyelid or not properly secured. Adjust as needed for comfort.
- Premature Falling Out: This often occurs due to improper preparation or application. Ensure your natural lashes are clean and dry, and use enough adhesive to secure the clusters.
Conclusion
DIY cluster lash trays offer unmatched versatility and cost-effectiveness for those looking to enhance their eye makeup. With the ability to customise and apply lashes tailored to your unique style, the possibilities are endless. Whether you prefer a subtle, natural enhancement or a dramatic, eye-catching look, mastering the use of cluster lash trays can elevate your makeup game. Experiment with different styles, lengths, and curvatures to find the perfect lash look that's uniquely yours. Embrace the creativity and freedom that DIY lash application offers and make each glance a statement of your personal style.


Share:
What Happens if You Cry Right After Getting Eyelash Extensions
What Are Cluster Eyelashes?