


Creating the perfect cat-eye look with DIY lash extensions can be a game-changer for your beauty routine. This comprehensive guide will take you through each step, ensuring you achieve that stunning, dramatic look effortlessly.
Understanding the Cat-Eye Look
The cat-eye look is characterised by its striking, upward sweep at the outer corners of the eyes, mimicking the shape of a cat’s eye. This style has been a staple in the beauty world for decades, offering an elegant and dramatic flair that can enhance any makeup look. It is especially popular for its ability to create an illusion of elongated, almond-shaped eyes, which many find flattering.
The history of the cat-eye look dates back to ancient Egypt, where it was popularised by iconic figures like Cleopatra. Over the centuries, this look has evolved, making a significant comeback in the 1960s with stars like Brigitte Bardot and Sophia Loren. Today, the cat-eye remains a timeless favourite, continually adapted and reinvented by makeup artists and beauty enthusiasts around the globe.
Understanding the essence of the cat-eye look is crucial before attempting it with DIY lash extensions. This knowledge will help you choose the right products and techniques, ensuring your final look is both authentic and flattering.
Choosing the Right Lashes for a Cat-Eye Look
Selecting the appropriate lashes is a critical step in achieving the perfect cat-eye look. Various types of lashes can be used, but for this specific style, it's essential to choose lashes that gradually increase in length towards the outer corners. This creates the desired winged effect that defines the cat-eye look. Mink, silk, or synthetic lashes can all be used, depending on your preference and budget.
When considering length and curl, it's important to choose lashes that complement your natural lash line while enhancing the cat-eye shape. Opt for lashes with a C or D curl, as these will lift and open up your eyes, contributing to the overall effect. Additionally, ensure the lengths of the lashes increase incrementally from the inner to the outer corners to achieve the signature gradient.
It's also worth considering lash clusters or individual lashes, as these offer more control over placement and customisation. This way, you can precisely adjust the length and volume to create a seamless and natural-looking transition, enhancing the cat-eye effect without looking overdone.
Preparing Your Natural Lashes
Proper preparation of your natural lashes is essential for achieving a flawless cat-eye look with DIY lash extensions. Start by thoroughly cleansing your lashes and eyelids to remove any oil, dirt, or makeup residue. This step ensures that the adhesive will bond effectively, providing a secure hold for your extensions. Use a gentle, oil-free cleanser or a specialised lash shampoo to clean your lashes without causing irritation.
Next, prime your natural lashes to create a perfect base for the extensions. A lash primer helps to remove any remaining impurities and provides a slightly tacky surface for the adhesive to grip. This step can significantly improve the longevity of your lash extensions, ensuring they stay in place and look fresh for longer.
Gather all the tools and products you'll need before starting the application. This includes lash adhesive, tweezers, a lash applicator, and a lash mirror. Having everything within reach will streamline the process and help you focus on achieving a precise and even application. Ensure your workspace is well-lit and comfortable, allowing you to work with accuracy and ease.
Mapping Out Your Lash Line
Mapping out your lash line is a crucial step in achieving a balanced and symmetrical cat-eye look. Lash mapping involves planning where each lash extension will be placed, ensuring a seamless and natural transition from the inner to the outer corners of your eyes. This step is especially important for creating the signature gradient effect that defines the cat-eye look.
Begin by dividing your lash line into sections, typically three or four, from the inner to the outer corners. Use a lash mapping pen or a white eyeliner pencil to mark these sections lightly. This will serve as a guide during the application process, helping you place each lash extension accurately and consistently. Pay particular attention to the outer corners, where the longest lashes will be placed to create the winged effect.
Consider the length and curl of the lashes you plan to use for each section. The inner corner lashes should be the shortest and gradually increase in length as you move towards the outer corners. This gradual increase creates the illusion of elongated, almond-shaped eyes. Mapping out your lash line in this way ensures a balanced and cohesive look, making the application process more manageable and precise.
Applying the Inner Corner Lashes
Applying lashes to the inner corners of your eyes requires precision and patience. These lashes are typically shorter and finer, creating a natural starting point for the cat-eye look. Begin by dipping the base of a lash cluster or individual lash into a small amount of adhesive. Allow the adhesive to become tacky for a few seconds, which will help it adhere better to your natural lashes.
Using tweezers or a lash applicator, carefully place the lash extension as close to your natural lash line as possible. Start from the innermost corner and work your way outwards. Ensure the lash is securely bonded by gently pressing it into place with the tweezers. Repeat this process, placing each lash slightly overlapping the previous one to create a seamless and natural look.
Common mistakes to avoid include applying too much adhesive, which can cause clumping, and placing the lashes too far from the lash line, which can create gaps. Take your time to ensure each lash is placed accurately and evenly. This attention to detail will lay a solid foundation for the rest of your cat-eye look, ensuring a smooth and natural transition as you move towards the outer corners.
Gradually Building Up to Longer Lashes
Creating a natural gradient from shorter to longer lashes is key to achieving the perfect cat-eye look. After applying the inner corner lashes, gradually increase the length of the lashes as you move towards the outer corners. This creates a subtle and natural-looking transition that enhances the overall cat-eye effect without looking overdone.
Select lash clusters or individual lashes that are slightly longer than the ones used in the inner corners. Dip the base into the adhesive and allow it to become tacky before placing it on your lash line. Position each lash slightly overlapping the previous one to create a continuous and seamless look. Ensure the lashes are evenly spaced and aligned to avoid any gaps or unevenness.
A helpful tip is to use a lash map or a white eyeliner pencil to mark where each length of lash should be placed. This ensures consistency and balance, making the application process more manageable. Gradually increasing the length of the lashes as you move towards the outer corners creates the illusion of elongated, almond-shaped eyes, enhancing the overall cat-eye effect.
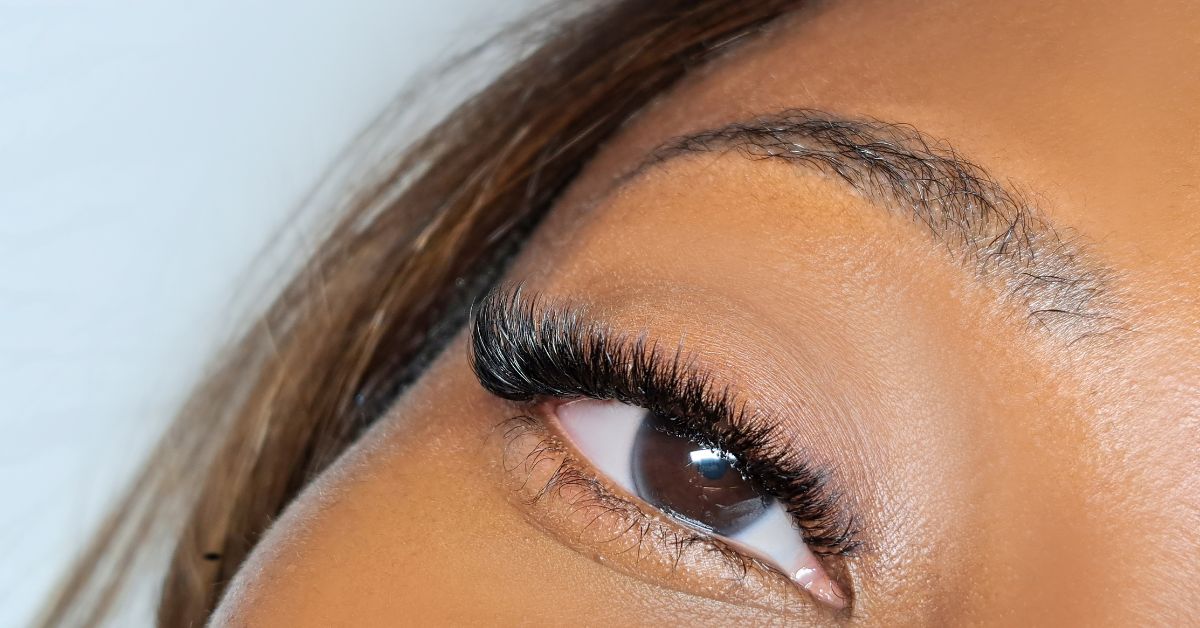
Perfecting the Outer Corner Flick
The outer corner flick is the defining feature of the cat-eye look, and achieving it requires precision and attention to detail. This step involves applying the longest lashes at the outer corners of your eyes, creating the signature winged effect. Start by selecting lash clusters or individual lashes that are longer than the ones used in the previous sections.
Dip the base of the lash into the adhesive and allow it to become tacky before placing it on your lash line. Position the lash at the outermost corner, slightly angling it upwards to create the winged effect. Use tweezers or a lash applicator to press the lash into place, ensuring it is securely bonded to your natural lashes.
Symmetry is crucial when perfecting the outer corner flick. Ensure both eyes have the same length and angle of lashes at the outer corners to create a balanced and cohesive look. Take your time to adjust and perfect the placement, making sure the winged effect is prominent and even on both sides. This attention to detail will elevate your cat-eye look, giving it a polished and professional finish.
Securing the Lashes for Longevity
Ensuring your DIY lash extensions stay in place and look fresh requires proper adhesive application and securing techniques. Start by choosing a high-quality lash adhesive that offers strong and long-lasting hold. Apply a thin layer of adhesive to the base of each lash extension, allowing it to become tacky before placing it on your lash line.
Use tweezers or a lash applicator to press the lashes into place, ensuring they are securely bonded to your natural lashes. Focus on the outer corners, as these areas are prone to lifting. Gently press and hold the lashes in place for a few seconds to ensure a strong bond. Repeat this process for each lash, making sure they are evenly spaced and aligned.
To ensure the longevity of your lash extensions, avoid touching or rubbing your eyes excessively. Additionally, refrain from using oil-based makeup removers or products around your eyes, as these can weaken the adhesive. By following these steps, you can maintain your cat-eye look for an extended period, enjoying the dramatic and captivating effect it creates.
Enhancing the Look with Eyeliner
Eyeliner is an essential tool for complementing and enhancing your cat-eye look with DIY lash extensions. Choosing the right eyeliner can make a significant difference in the overall effect. Opt for a waterproof, long-lasting formula to ensure your liner stays in place throughout the day. Gel or liquid eyeliners are particularly effective for creating sharp, precise lines.
Start by drawing a thin line along your upper lash line, beginning from the inner corner and gradually thickening the line as you move towards the outer corner. Extend the line slightly beyond your natural lash line to create the winged effect that characterises the cat-eye look. Use small, controlled strokes to achieve a smooth and even line, avoiding any harsh or jagged edges.
For added intensity and drama, you can also line your waterline with a dark eyeliner. This step enhances the overall look, making your eyes appear larger and more defined. To ensure your eyeliner complements your lash extensions, choose a shade that matches or blends seamlessly with your natural lash colour. With the right techniques and products, you can achieve a flawless and striking cat-eye look that lasts all day.
Caring for Your DIY Lash Extensions
Proper care and maintenance are essential for keeping your DIY lash extensions looking fresh and beautiful. Start by avoiding water and steam for the first 24 hours after application, as this allows the adhesive to fully bond. After this initial period, be gentle when cleansing your face, avoiding direct contact with your lashes.
Use a soft, lint-free cloth or a specialised lash brush to clean your lashes. Gently brush through them to remove any debris or buildup, ensuring they remain fluffy and voluminous. Avoid using oil-based products around your eyes, as these can weaken the adhesive and cause your lashes to fall off prematurely. Instead, opt for oil-free makeup removers and cleansers.
To extend the life of your lash extensions, refrain from rubbing or pulling on them. If you notice any loose or misaligned lashes, carefully remove them with tweezers and replace them with a fresh extension. By following these care tips, you can maintain the stunning cat-eye look for an extended period, enjoying the dramatic and captivating effect it creates.
Troubleshooting Common Issues
Even with careful application, you may encounter common issues with your DIY lash extensions. One of the most frequent problems is gaps or uneven application. If you notice any gaps, carefully fill them in with additional lash clusters or individual lashes, ensuring they blend seamlessly with the surrounding lashes. Use tweezers or a lash applicator to adjust and perfect the placement.
Another common issue is adhesive problems, such as clumping or lifting. To avoid clumping, use a small amount of adhesive and allow it to become tacky before applying the lash. If you experience lifting, gently press the lash into place with tweezers and hold it for a few seconds to ensure a strong bond. Avoid using too much adhesive, as this can cause clumping and discomfort.
If you experience irritation or discomfort, it may be due to an allergic reaction to the adhesive or improper application. Remove the lashes immediately and cleanse your eyes thoroughly. Consider switching to a hypoallergenic adhesive or consulting with a professional for further guidance. By addressing these common issues promptly, you can ensure a flawless and comfortable cat-eye look.
Conclusion
Creating a cat-eye look with DIY lash extensions is a rewarding and transformative process. By understanding the fundamentals of the cat-eye look, choosing the right lashes, and following a precise application technique, you can achieve a stunning and dramatic effect. Proper care and maintenance will ensure your lash extensions stay in place and look fresh for an extended period. With practice and attention to detail, you can master the art of DIY lash extensions, enjoying the captivating and elegant look of the cat-eye style.


Share:
The Role of Lash Primers in DIY Lash Extension Application
Seasonal Lash Care: Protecting Your DIY Extensions in Summer and Winter